It is that time of the year again. Leaves are beginning to fall. The warm air is turning into a brisk wind. For pool owners in four-season climates, it is indeed a sad day. You must close and winterize the pool.
Learning how to close an inground pool yourself properly can seem intimidating.
However, it is one of the most important parts of pool maintenance and can save you money in the long run by not relying on a pool service annually.
It will also save you a lot of time in the spring when it is time to open again!
Follow This Guide to Close Your Pool
The actual process of closing a pool only takes a few hours. Most of the time will be spent preparing, testing, and cleaning the pool.
Tip: When the pool is closed, we want to ensure it’s as clean as it’s been all season.
Before Closing Day
A few things need to be done before the actual day of closing the pool. This preparation is crucial to the pool’s overall health over the winter.
The last thing we want to see when we open in the spring is a green, slimy mess!
Gather All Materials and Pool Chemicals Needed to Close
I do not like “closing kits” or other related items that stores may try to sell you. You probably already have most of what is needed.
Depending on the test results of the water, you shouldn’t need more than the recommended pool chemicals.
Here is a full list of what you may need to close a pool:
- Testing kit
- Shop vac or air compressor
- Screwdrivers and wrenches
- Gizzmos
- Threaded jet plugs
- Sealant tape
- Winter pool cover
- Pool cover patch kit (if necessary)
*As an Amazon Associate, I earn from qualifying purchases at no additional cost to you.
Wait for a Good Time to Close
Before you start the process, you will want to know when to close the pool. Ensure your water temperatures are consistently 60 degrees and below.
Algae spores have a much harder time growing when water temperatures are colder.
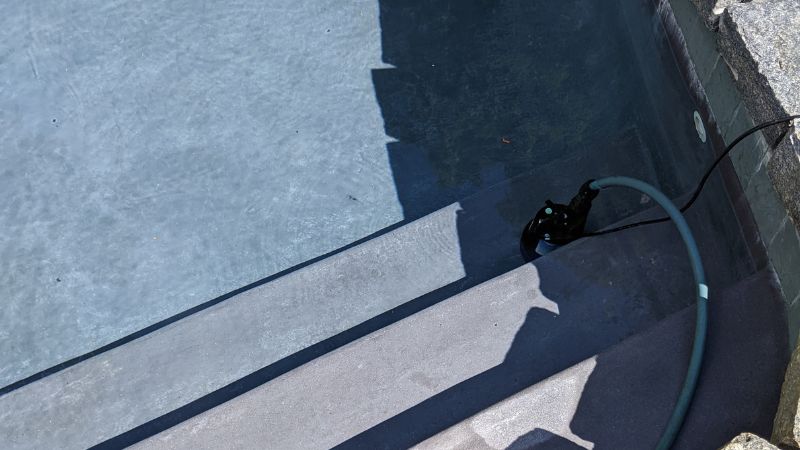
Test And Balance Your Water
A few days before deciding to close, ensure water chemistry levels are properly balanced.
For added insurance, use a non-copper algaecide like Polyquat 60. This isn’t necessary, but it can give you a little piece of mind that there is an extra layer of algae protection.
Administer the Polyquat 60 per dosing instructions on the product manual. Distribute it evenly in the pool with your pool brush.
(OPTIONAL) Get the Pool to Shock Level
After testing, raise free chlorine (FC) to your shock level based on your CYA reading. Refer to the chart below for your targeted shock level:
| CYA (Stabilizer) | FC to Shock Level |
|---|---|
| 20 | 10 |
| 30 | 12 |
| 40 | 16 |
| 50 | 20 |
| 60 | 24 |
| 70 | 28 |
| 80 | 32 |
| 90 | 36 |
| 100 | 40 |
Use our chlorine calculator to see how much chlorine is needed to reach this level.
After dosing, let it gradually drift down to normal levels. When you are ready to close the pool, your FC levels should be at the recommended range based on the CYA.
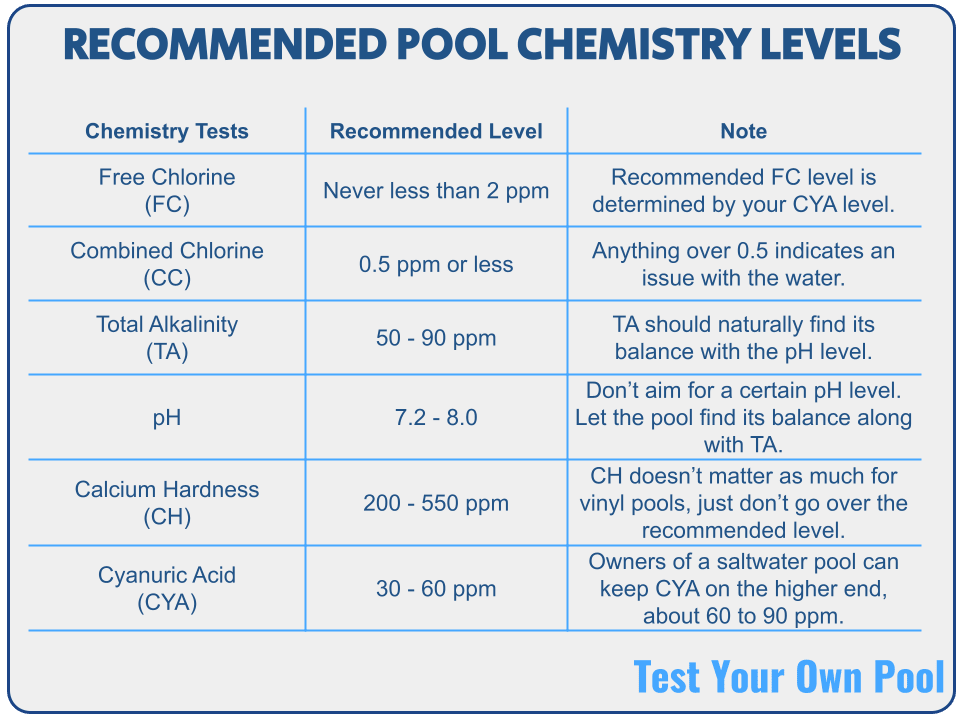
Check the Pool Cover
Now would be a good time to check your pool cover for any tears or maintenance that needs to be done. Depending on where it is stored, it is not uncommon to see mice nests and bites on the cover.
Lay it on your driveway or in the yard to inspect the cover. Remember, any large holes will invite sunlight to hit the water. Prolonged sun throughout the winter can warm up the water faster than we would like!
A patching kit is a good insurance to have for quick hole repairs.
Closing Day!
Now that the pool is ready for closing, the rest of the steps can be done on the day of closing.
It should not take longer than a day to close. However, having more than one person helping out can make it go much quicker.
Remove and Store Pool Accessories
Use the necessary tools to remove any ladders, railings, and other accessories that are in the pool. Wash, clean, and properly store your accessories so they are ready to go for next year.
Clean Your Pool
You’ll want to make sure your pool is as clean as possible. Get out your pool brush and scrub every inch of your pool, from the walls to the floors.
Put your robot to work, or get the manual vacuum out and suck up all the debris, leaves, and sediment. Generally speaking, your pool should be cleaner than your weekly maintenance routine.
Tip: If you have a sand or D.E. filter, do a final backwash to get as much dirt, gunk, and grime out of your filter before doing a final filter cleaning.
Clean and Backwash the Pool Filter
Understanding that the filter will not be used for a few months, it should be cleaned of any extra debris so it is ready to go in the spring.
For a sand filter, backwash them to clean out both the filter housing and the sand.
If you have a cartridge filter, remove the grids from the filter housing and give them a good hosing. They should be clean and clear of any debris.
For a diatomaceous earth (DE) filter, backwash it to get most of the grime and DE off of the grids and fingers. After the backwash, remove the grids and wash them down with a hose. The goal is to remove the extra DE, so it isn’t caked on over the winter. Trust me, removing this DE in the spring will be a much more difficult task!
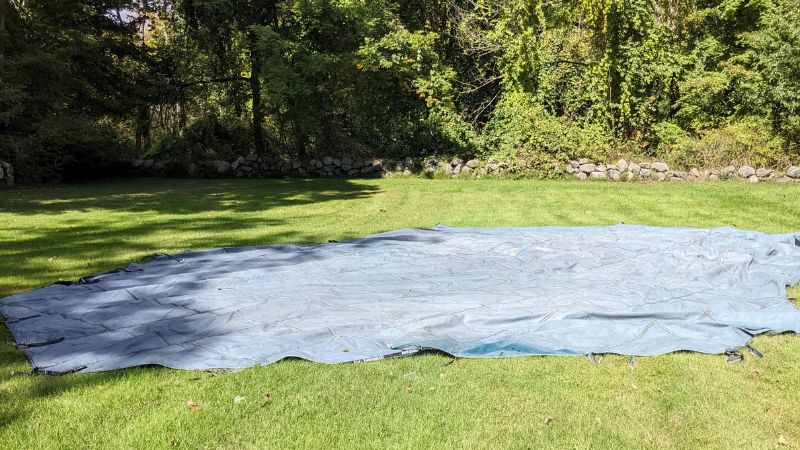
Lower the Water Level
If you live in an area where water is likely to freeze in the winter, you’ll want to drain your pool water to an appropriate level based on the type of cover and type of pool that you have.
With a mesh cover, you want to drain the water about 12 to 18 inches below the skimmer. The cover’s manual should have specific draining instructions for best use.
Drain about 3 to 9 inches below the skimmer for a solid cover. Like above, look at your cover manufacturer’s manual for more accurate instructions.
Some covers may not require you to drain that far and can void any warranties if it gets damaged by not following their specific guidelines.
Drain Pool Equipment and Blow Out Lines
The most important step in the closing process is removing all the water from your pipes or “blowing out the lines.” This will prevent any costly damage or cracking in your pipes underground.
There are a few ways to blow out your lines, which largely depend on the overall setup and the equipment setup.
Use an air compressor or a ShopVac that is powerful enough to move the water through the pipes. Anything above 3 HP should be sufficient enough.
I like to clear the lines with a ShopVac. It’s easier and more efficient, in my opinion. Here is a quick guide on how I do it:
- Remove the fittings and plugs from the filter, pool pump, and heater if you have one. Drain all of the equipment with water. Remove the basket lid from the pump and Let the filter bleed air out as it’s draining.
- Remove the return jet eyeballs and plugs from the skimmer.
- If you have a multiport valve, set it to RECIRCULATE.
- Make sure ShopVac can have a tight seal on the return lines and skimmer. I usually tape a wad of duct tape to the end of the nozzle until it’s thick enough not to have any air pass through.
- Starting from the return lines in the pool, insert ShopVac and blow the lines. You will start to see water flowing out of the filter. Blow until all left is a fine mist blowing into the filter. Do this on every return jet that you have.
- To close the return jets for the season, plug them with threaded plugs or a rubber expansion plug.
- TIP: For increased pressure, plug the return jet lines that aren’t in use. When one line is done, open another and keep going until all return lines have been blown out.
- Insert ShopVac into the skimmer line. You will start to see water flowing out of the pool pump. Like the return lines, continue until you only see a mist coming out. Do this for every skimmer line.
- TIP: If you want extra insurance, dump some antifreeze in the skimmer after blowing it out. Just make sure it is rated for pool use and not for cars!
- Plug the skimmer lines with Gizzmos. These are made to absorb any ice expansion in the skimmer over the winter. They are incredible insurance policies and are highly recommended over a standard threaded plug.
- Set the pool filter valve to the winter option if you have it.
NOTE: Wrap your winter plugs and Gizzmos with sealant tape for a tighter water seal.
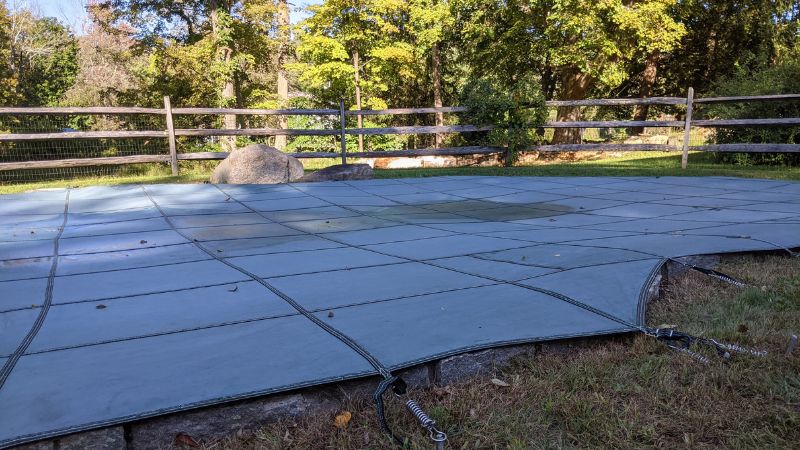
Cover the Pool
After your pool lines have been blown out, the last step is to cover the pool. This is the last chance to remove any debris or leaves falling in during the closing process.
Make sure to patch any holes that you see in your cover. Also, take the time to clean and wash out any dirt or grime that happens to get on your cover during storage.
You don’t want to waste all that time and effort to clean your pool just to put a dirty cover on top!
Refer to your cover manufacturer for proper instructions on how to cover your pool.
What Happens If You Don’t Close Your Pool For the Winter?
During the swim season, you are doing routine pool maintenance: cleaning the pool, skimming leaves and debris, and brushing the surface. It’s done to remove debris and keep it clean and healthy.
Think about all the leaves and crud that can get into the pool during the fall and winter without a cover, slowly rotting and decaying into the water for months and disrupting your chemistry.
The best scenario is that you will be dealing with a green, swampy mess in the spring.
However, other unforeseen consequences can cause you and your wallet agony:
- Cracked skimmers
- Pipes bursting
- Tiles popping off
In other words, knowing how to close a pool properly will save you time and money!
Patiently Wait to Open in the Spring!
During the winter months, keep an eye on the pool. Depending on the type of cover, you may need to drain water from the top or pool several times.
There are a couple of winter maintenance tips to follow as well to ensure your pool is in the best shape possible for the spring.
Remember, more preparation and care during the closing process will make opening in the spring much easier!