There will most definitely come a time when a pool’s water needs to be drained either for pool closing, repairs, replaster, or vinyl replacement.
While it isn’t too hard of a process, it does require some pre-planning and perhaps some investigation into your town’s rules about water runoff.
Before you Drain Your Water
Before removing water, you’ll need to ensure a few items are taken care of first.
Doing these steps beforehand will save you major headaches if something happens to your equipment or water disposal site.
Check Your Local Municipality Laws
Most municipalities have requirements of where and when you can drain pool water. So consult with your local town ordinances before you start dumping thousands of gallons down a sewer drain.
They should tell you about restrictions and if your pool water needs to be chlorine neutral.
Check the Weather
This isn’t as important if you’re partially draining below the skimmer. However, when fully removing all the water in the pool, the weather can play a big role for when you can and can’t drain.
Ideally, you should only drain when the weather is about 85°F or lower.
Pools are made to hold water and not be exposed to much heat. An empty pool in high heat can cause cracks, blisters, and irreversible damage to your liner.
Check your Wallet!
Draining water will require a refill somehow.
Whether it’s from a local company or through your water hose, it isn’t cheap. Make sure you budget water replacement ahead of time.
Draining Your Pool Water Below the Skimmer
There are three ways to drain pool water below the skimmer. This applies to both inground and above-ground. Combining all three should allow you to drain as much as is needed.
- Through the pool pump and filter (only recommended for partial drains above the skimmer line)
- Submersible pump
- Creating a siphon (the fun way!)

If you are doing a partial drain either to close the pool for the winter or because your chemical levels are a little out of sorts, the process is pretty straightforward.
A full drain will require you to watch out for the “pool pop” and releasing of the pool’s hydrostatic plugs, which you can learn more about below.
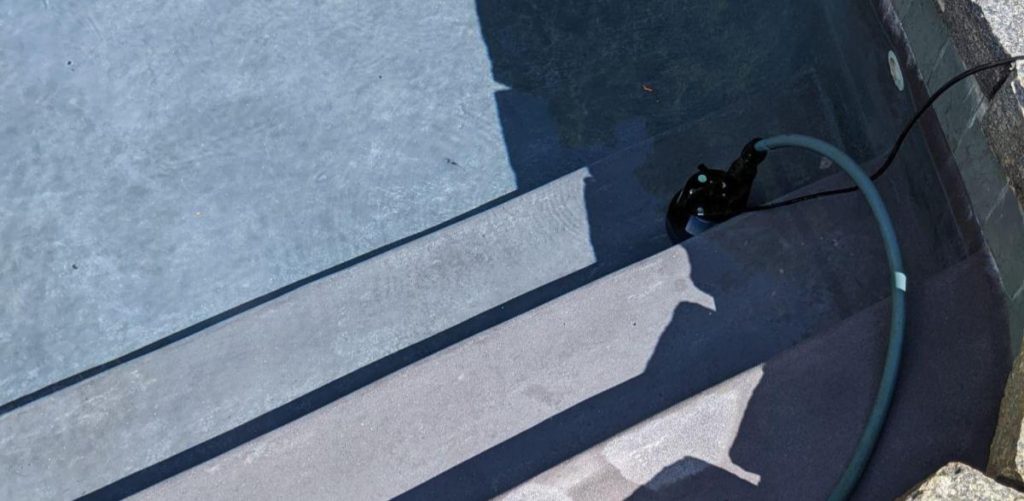
Draining With a Submersible Pump
To drain a pool only a couple of inches or a few feet, follow these steps using a submersible pump:
- (Optional) Drain the pool water through your multiport valve set to WASTE. This should allow water to be drained quicker than a submersible pump.
- Note: this draining method should be done only until the bottom of the skimmer line is reached. You do not want your pump sucking air and potentially damaging your equipment.
- You can stick a vacuum hose in one of the skimmer lines (with the other skimmer ports closed) and see if you get enough suction to keep going. If that is not working, go to step 2.
- Unplug the pool equipment (pump, lights, automatic timers) to ensure nothing turns on during draining. This is especially important if the draining will take water below the skimmers.
- Attach a garden hose or a discharge hose of choice to a submersible pump and place the pump underwater to at least a lower level of the draining endpoint.
- Direct the hose to a drain point. This can be a sewer, road, yard, or wooded area.
- Plug the pump into a GFCI outlet. The pump should start running at this point.
- Check the drain point to ensure there are no knots in your hose and that the water flows freely.
- Check periodically on your water levels. Depending on how much water is being drained, the process can take up to a day or longer.
If you are in a physics mood, you can create a siphon to drain the pool! This method will ultimately take the longest, but it is much cheaper.
Create a Siphon
Siphoning the water is the cheapest (and most fun) way to drain the pool, though it will also take the longest.
A siphon will work as long as the place you are draining the water to is at a lower elevation point than the pool’s water level.
To start a siphon:
- Fill up your hose with water. If you’re using a garden hose, use your spigot and run water through it until it is filled. When finished, hold both ends of the hose evenly so water doesn’t come out. You want as much water in the hose as possible.
- Place one end of the hose into the pool. Make sure it’s at a spot where you want the water level to be
- Set the other end of the hose at a spot lower than the hose’s end in the pool.
- This should create a siphon that will continuously suck the water out naturally!
What to Know When Fully Draining the Pool
When you are fully draining the pool, you want to make sure you know where your hydrostatic valves are to avoid some serious damage.
Avoiding the Inground “Pool Pop”
“Pool pop” refers to a truly unfortunate situation where the pool pops out of the ground after it is drained of water.
If you aren’t careful, serious damage can be done to the pool; the coping and decking can break apart, the pool’s piping can crack, and the pool shell can split into pieces.
This typically occurs if your area has a high water table or recently rained and the surrounding area is wet. This is why you must wait for a cooler, dry day if the plan is to drain the pool fully.
Another item to mention: homeowner’s insurance rarely covers damage from your pool popping, so you want to avoid it!
Know your Hydrostatic Relief Valves
These valves are primarily used to avoid the “pool pop”. They are essentially pipes that usually terminate into gravel and allow groundwater to come up, thus relieving the pressure that can build up by removing pool water.
They are usually located on the pool’s floor and plastered in place. You may need a chisel and break some of the plaster to get to the ring, and you will release these valves when the pool is pretty much drained. Read here for more information about these valves.
Drain Away
As mentioned, draining the pool isn’t too difficult of a task, there needs to be a few items to keep in mind.
If a drain is necessary, try and accomplish multiple tasks simultaneously to avoid multiple draining and replacing instances.