How to Use Taylor Test Kits for Your Pool’s Water
While there are different ways of testing your pool water, it is highly recommended to use a pool testing kit as the primary source or to supplement other sources.
Taylor Technologies is almost synonymous with pool testing. Because of this, they have set the standard with their line of testing kits, combining accuracy and convenience all in one.
Which Testing Kit Should I Use?
The most reliable testing kit currently is the Taylor K-2006. It uses the most accurate method of testing chlorine with a FAS-DPD test.
Testing needs to be accurate so you aren’t over or underdosing pool chemicals.
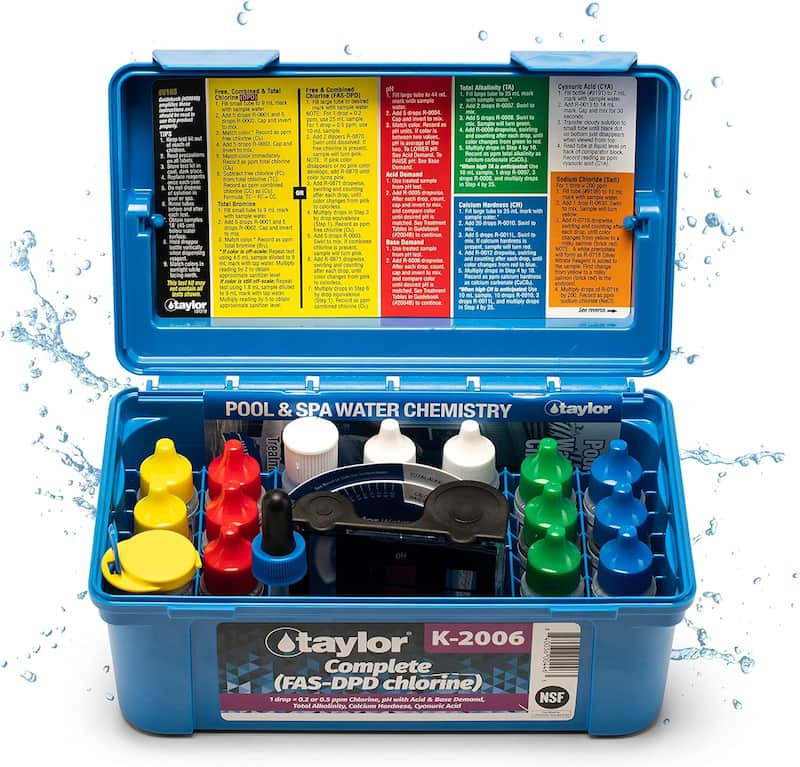
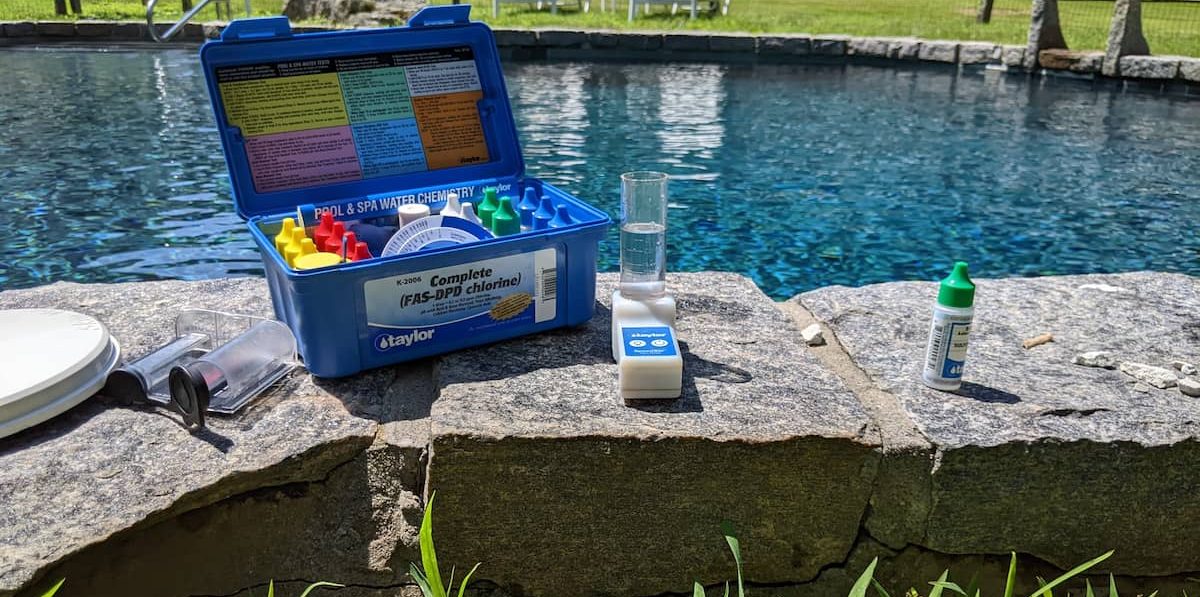
Taylor K-2006 Pool Test Kit
The most accurate testing kit currently on the market. Includes FAS-DPD chlorine test and reagents for every chemistry parameter that needs testing.
*As an Amazon Associate, I earn from qualifying purchases at no additional cost to you.
Taylor kits use a titration drop-count measurement system by way of testing reagents. Most tests are completed when the water sample turns from one color to another.
They may require a steeper learning curve and can be more time-consuming, but once the tests are done a few times it’s just like any other kit.
Items to Consider When Testing With Taylor Kits
- Use a clean water sample: The sample tested is almost as important as the test itself. Make sure that the sample represents the actual pool water as possible. Here are the steps needed:
- Use a clean bottle, cup, or glass jar to gather the sample.
- Find an area in the deep end that is away from any jets and skimmers. You want a place that doesn’t get too disturbed.
- Insert the cup face down in the water about elbow deep. You don’t want any water to get in it yet, so create an air gap until you reach the elbow
- Turn the cup over until the cup fills. You now have your sample!
- Understanding endpoints: As Taylor uses a drop-count measuring system, you want to count the number of drops used until a color change occurs. When that happens, this is referred to as the endpoint.
- There are times when the sample changes slightly to the intended color. If this happens, and you add another drop that fully changes color, you do not count that last drop.
- Use the correct sample volume: Each test kit comes with a test tube with lines indicating water volume. Each test has a specific volume of water that needs to be used and the water should be almost exactly to that line.
- Test quickly: Do not overthink when testing. Taylor recommends each test take about a minute to ensure the most accurate results.
- Water temperature: Water should be between 50-90℉ for accurate testing. More specifically, CYA testing should be done with water over 70℉. If you need to warm the sample, run hot water over it or let it sit out for a couple of hours.
- Swirl, not shake! After each drop, the test tube needs to be moving in a swirling motion, not shaking. This can become tedious, so it is recommended to use Taylor’s SpeedStir to significantly speed up the process.
- Drop size counts: Ensuring each drop is consistently the same says will make the tests much more accurate. Make sure the reagent dripper bottles are held vertically and not at an angle. If drops get reduced in size during the test, wipe the top of the dripper to remove any excess reagent chemicals.
- Prepare for the Next Chemistry Test: The test tube should be cleaned out of any previous testing chemicals and water before each use, ensuring the most accurate results. Simply pouring fresh water and swirling for a couple of seconds is all that is needed.
- Follow all instructions: Take some time to read the manual that comes with the test for all tips and guidelines on testing.
- Keep a record of tests: Whether you have a notebook, excel spreadsheet, or use an app, tests should be recorded to monitor previous results. This also gives you a better understanding of how the pool behaves over periods of weeks, which can alter how much water maintenance is needed.
While this may seem a little meticulous, it is important to ensure testing is as accurate as possible. After a couple of rounds of testing, however, most of it becomes second nature.
How to Perform Each Test: Proper Procedure For Taylor K-2006 Kit
Before testing, it is important to understand what is actually being tested and how they relate.
Each Taylor test kit comes with a great color-coded guide on performing each test to make it as easy as possible.
Each test is paraphrased below, but refer to your kit for even more instructions. Keep in mind these will be testing procedures for the K-2006 version of Taylor tests
Chlorine (FC) and Combined Chlorine (CC)
- Fill the test tube to 10 mL line with the water sample.
- Add a dipper of R-0870 (Taylor says 2 but save yourself some powder, 1 is plenty!). If FC is present, the sample should turn pink. If the sample does not turn pink, FC is 0.
- Add R-0871 dropwise until the color changes from pink to colorless.
- Multiply drops by 0.5. This is your FC number.
- Ex: 8 drops would mean FC is 4 ppm.
- To get CC levels, keep the same sample and add 5 drops of R-0003. Swirl to mix. If CC is present, the sample will turn back to pink. If still clear, CC is 0 which is great!
- If the sample turned pink, add R-0871 dropwise until the color changes from pink to clear.
- Multiply drops by 0.5 to get CC. Remember, anything above 0.5 ppm usually means there is something growing in the water that needs attention.
pH
- Fill a large comparator tube (a different test tube that comes in the kit) to 44 mL with the water sample.
- Add 5 drops R-0004. Cap and invert the tube to filly mix.
- Match the color to the color variants on the side of the tube. Use your best judgment here. If the sample looks to be between two colors, average the two numbers.
- If pH needs lower, perform an acid demand test
- Use treated sample from pH test
- Add R-0005 dropwise. After each drop, cap and invert then compare the colors. If it is in range, refer to the Taylor manual on how much muriatic acid to add.
- If pH needs raised, perform a base demand test.
- Use treated sample from pH test.
- Add R-0006 dropwise. After each drop, cap and invert then compare the colors. If it is in range, refer to the Taylor manual on how much borax to add to the pool.
Total Alkalinity (TA)
- Fill test tube to 25 mL with the water sample.
- Add 2 drops R-0007. Swirl to mix.
- Add 5 drops R-0008. Swirl to mix. The sample should turn green.
- Add R-0009 dropwise, swirling after each drop. Count drops until color changes from green to red.
- Multiply drops by 10 and record as ppm
- Ex: 5 drops is 50 ppm TA
Calcium Hardness (CH)
- Fill test tube to 25 mL with the water sample.
- Add 20 drops R-0010 and swirl.
- Add 5 drops R-0011L and swirl. The sample should turn red if CH is present.
- Add R-0012 dropwise, swirling after each drop. Drop, count, and swirl until the color changes from red to blue.
- Multiply drops by 10 and record as ppm
- Ex: 30 drops is 300 ppm CH
- If a high level of CH is anticipated, you can alter the test a bit. After all, no one has time for 80 drops!
- Use 10 mL sample, 10 drops R-0010, 3 drops R-0011L, and then multiply the drops by 25.
Cyanuric Acid (CYA)
- Fill CYA bottle (#9191) to 7 mL with a water sample.
- Add R-0013 to 14mL mark. Cap the bottle and mix for 30 seconds. This is where you can shake it!
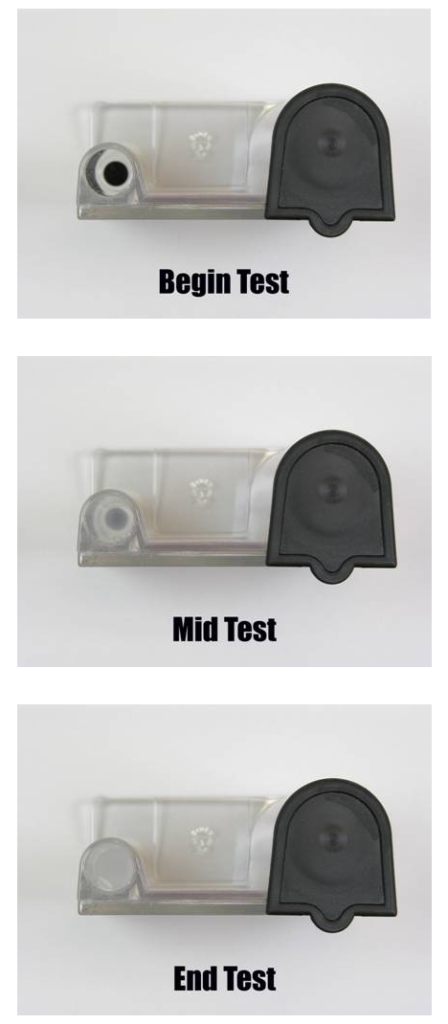
- Use the same tube comparator that tested pH, but use the other side. You should see numbers listed to 100 and a black dot at the bottom. This black dot will determine your CYA level.
- Stand outdoors with your back facing the sun. Hold the tube at about waist level.
- If you are not in the sun or it is cloudy, find the brightest artificial light.
- Pour mixture into each number on the tube. Glance at the bottom of the tube. If you can see the black dot, continue pouring.
- .Pour into each number until all traces of the black dot is out of view
- You don’t have to be too scientific here. You want a quick glance. If you can see the dot, continue with testing. If you can’t at a glance, you are done.
- Once the dot is out of view, record the number on the tube as ppm.
- Ex: If you can see the dot at 60 ppm, but not at 50 ppm, record as 60 ppm.
- If the dot disappears halfway between 60 and 50, record as 60 ppm.
A couple of notes on CYA testing
- If the tube is completely full and you still see the dot clearly, your CYA is 0.
- If the tube is completely full and you can partially see the dot, CYA is above 0 but lower than last number on the tube (usually 20 or 30).
- If the black dot disappears before reaching the first number (usually 90), you’re CYA is 90 or higher. You’ll want to retest with the following procedure.
- Fill CYA bottle to 7 mL with the water sample.
- Add tap or fresh water to the 14 mL mark. Cap and shake for 30 seconds.
- Pour half out of the mixing bottle so it is filled to 7 mL
- Continue the testing as normal from the point where you add R-0013.
- Multiply the final result by 2
- Ex: If your CYA level reads as 60 ppm, it is actually about 120 ppm.
Taylor provides a good visual of what each point on the test means. Again, don’t think too much about the dot. If you glance and you can’t see if, after a few seconds, the test is complete
Happy Testing!
It seems complicated at first, but after performing the tests and going through the procedures a couple of times, all of this will be done by memory alone.
Just remember to record your numbers after each round of testing!